Purposes
I’m sometimes using a Luxafor device at work, and I finally bought one for the fun - because I guess that there’s something interesting to do with it. Luxafor only provides clients for Macos and Windows, so I could write a Luxafor client for Linux, couldn’t I ?
I knew that there was, at that time, at least two libraries, written for nodejs and for python that could do the trick, but that’s not fun, the challenge is elsewhere :p
It doesn’t look so hard, it’s basically binary data sent over an USB device, isn’t it ?
The plan is all about :
- capturing binary data sent from the official Luxafor client to the physical device
- analyzing the client -> device communication to be able to reproduce with our own-baked client.
Capture the USB traffic
There’s no client for Linux platforms, so I have to capture USB packets from a Windows or from a MacOs installation. Sadly, capturing USB communication is far too complex on a recent MacOs and I lost 2 hours trying it inside a physical Windows OS.
That’s why I decided to have a VirtualBox’ed Windows guest OS running inside a Linux host. Best of both worlds: I can install the Luxafor client on Windows and easily capture the USB on the Linux host thanks to the USB forwarding capacity of VirtualBox.
Install required pieces of software
$ sudo install wireshark virtualboxPre-requisites that won’t be explained :
- Install a Windows Virtual machine with VirtualBox
- Install the Luxafor client for Windows
Forward USB device from host to guest
- Make sure to install the extension pack for the host and the Guest add-ons for the guest
- Add your user to the virtualbox group
$ sudo adduser $(whoami) vboxusers-
Make sure to logout the current session for this to apply, before running VirtualBox. Else, the hypervisor won’t be able to forward USB device traffic.
-
Open box settings, open the USB tab, activate USB 2.0 (EHCI) and add the device :
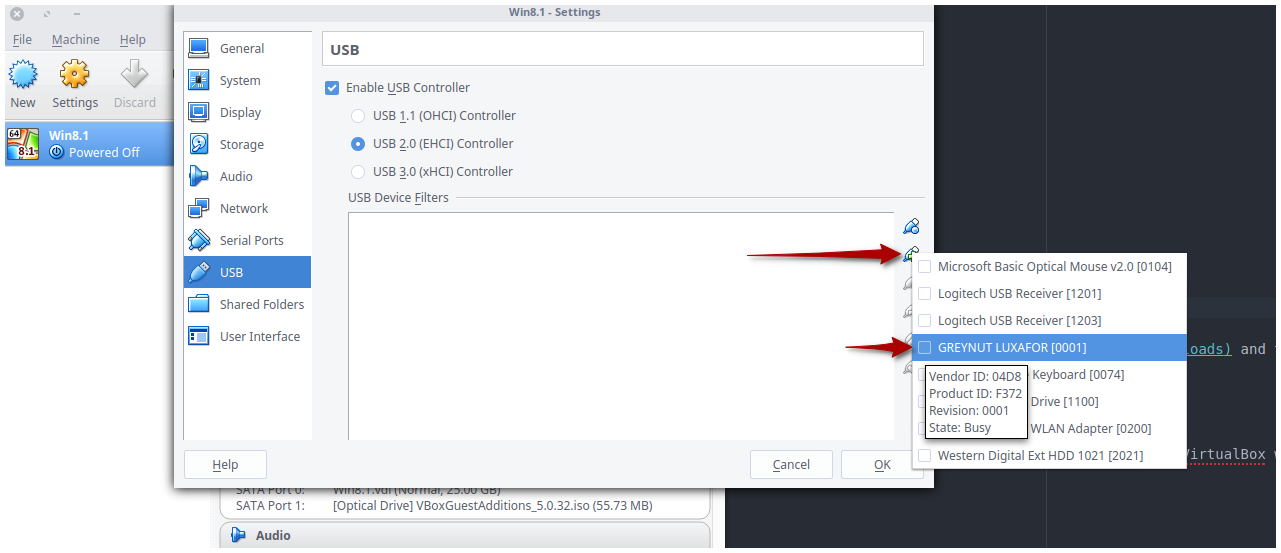
- Once done, start the VM and launch the Luxafor client.
Load usbmon Kernel module & start Wireshark
The following command will register the USBmonitor module to extend the Linux Kernel :
$ sudo modprobe usbmonThen start Wireshark as su :
$ sudo wiresharkFind in which monitor the Luxafor is plugged
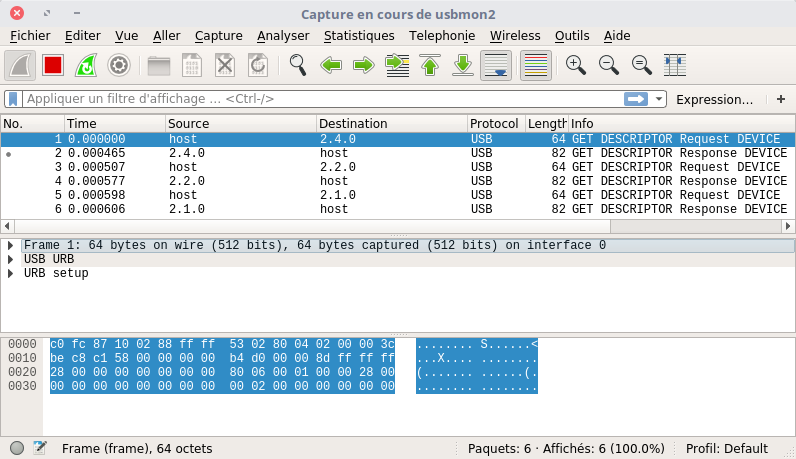
When Wireshark starts, you’ll see the live traffic on each interfaces that can be sniffed by the tool. The usbmon2 traffic pikes matches exactly the time when I changed the color of the device from the Windows client :
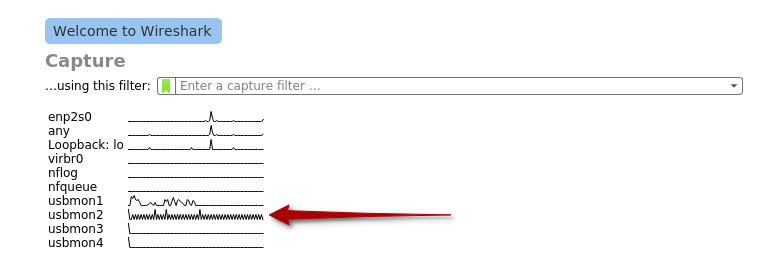
Capture Live USB traffic
Activate the Luxafor color RED
Double-click on usbmon2.
Change Luxafor color and analyze the payload
Change the Luxafor color to blue ; when color change, Wireshark has captured you packets :
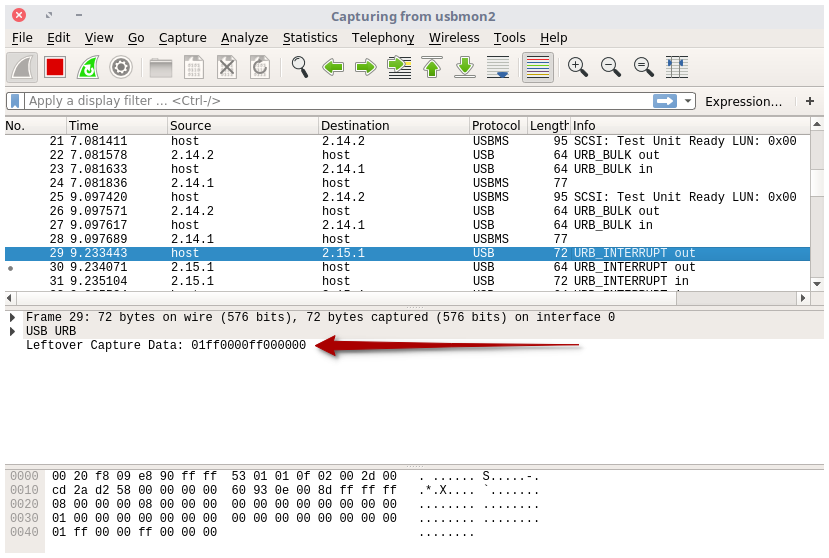
The most important information is the URB_INTERRUPT out packet sent from host to USB device. The leftover capture data are the actual payload that has been sent to the USB device :
01 ff 00 00 ff 00 00 00Bingo !
- The packet sent is eight bytes data long
- There’s one
ffafter two00. My guesses : the first00stand for Red channel (0x00), the second for the Green channel (0x00), and the last one for the Blue channel (0xff). It seems too obvious. - Simple test : what happens if I set the color to yellow ? If I’m guessing right, Luxafor should sniff hexadecimal values like :
01 ff fa fa 00 00 00 00Let’s try (… but the Windows Luxafor client doesn’t allow accurate settings).

Guess what :
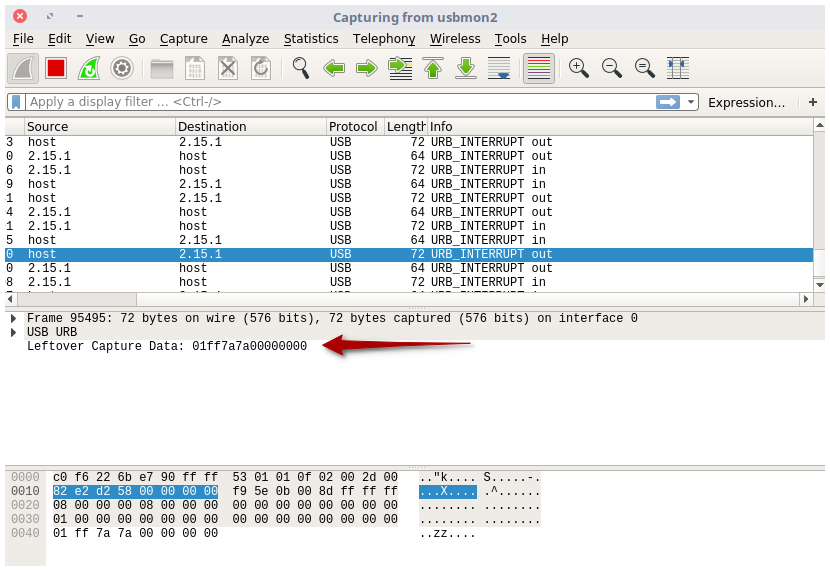
Lucky man :
01 ff fa fa 00 00 00 00It can be concluded that…
The payload sent over the USB device is made of 8 bytes :
- first byte : unknown meaning
- second byte : unknown meaning
- third byte is for the red channel
- fourth byte is for the green channel
- fifth byte is for the red channel
- sixth byte : unknown meaning
- seventh byte : unknown meaning
Unload usbmon Kernel module
To close your monitoring session in a clean way, unload the usbmod module :
$ sudo modprobe -r usbmonWrite the client
In this chapter, we’ll write a Vala program to change the Luxafor color.
If you want to fully understand the next chapter, let me suggesting to read chunks of documentation from LibUSB. It’s what I did, and I learnt that prior to connect to an USB device, I have to find its vendorID and productID.
Find USB vendorID / productID
Capture with lusb command the list of connected device - with the Luxafor un-plugged, and re-fetch the list with the Luxafor plugged to guess which one is the device you’re looking for :
$ lsusb > unplugged
# Plug your device
$ lsusb > plugged
# Don't remove any USB device a that time :p
$ diff plugged unplugged
1d0 < Bus 002 Device 008: ID 04d8:f372 Microchip Technology, Inc.
What’s left is the Luxafor device. 04d8:f372 are respectively the vendorID and the productID we’re looking for.
Install Vala and other dependencies
On an apt package manager based system, it’s really straight forward :
$ sudo apt-get install vala libusb-1.0-0 libusb-1.0-0-dev libusb-devVala code
- The color we want to send to the device is a pure white
0xff 0xff 0xff - We have to claim the interface of the device uniquely identified by vendorID
0x04d8and productID0xf372
main.vala
int main(string[] args)
{
	LibUSB.Context context;
	LibUSB.Device[] devices;
	LibUSB.DeviceHandle handle;
	LibUSB.Device? luxafor = null;

	LibUSB.Context.init(out context);
	context.get_device_list (out devices);

	int i = 0;
	while (devices[i] != null)
	{
		var dev = devices[i];
		LibUSB.DeviceDescriptor desc = LibUSB.DeviceDescriptor (dev);
		if (desc.idVendor == 0x04d8 && desc.idProduct == 0xf372)
		{
			luxafor = dev;
			break;
		}
		i++;
	}

	if (null != luxafor)
	{

		int result = luxafor.open(out handle);
		if (result != 0) {
			return 1;
		}

		handle.detach_kernel_driver(0);

		int retries = 1000;
		int claim_device_result;
		while ((claim_device_result = handle.claim_interface(0)) != 0 && retries-- > 0) {
			handle.detach_kernel_driver(0);
		}

		if (claim_device_result == 0)
		{
			int len;
			handle.bulk_transfer(1, {0x01, 0xff, 0xff, 0xff, 0xff, 0x00, 0x00, 0x00}, out len, 10);
		}
	}

	return 0;
}- the device is identified by
if (desc.idVendor == 0x04d8 && desc.idProduct == 0xf372) - the packet will be sent with this method call :
handle.bulk_transfer(1, {0x01, 0xff, 0xff, 0xff, 0xff, 0x00, 0x00, 0x00}, out len, 10);
Compile and run
Compile
$ valac --pkg libusb-1.0 main.vala -o usbRun
$ sudo ./usbAnd there is light !
Luxafor start and the color change immediately to white bright color, as expected !
Thanks for reading, any feedbacks or contributions via issues or pull requests are welcome !